Wednesday, October 29, 2014

Menu Board

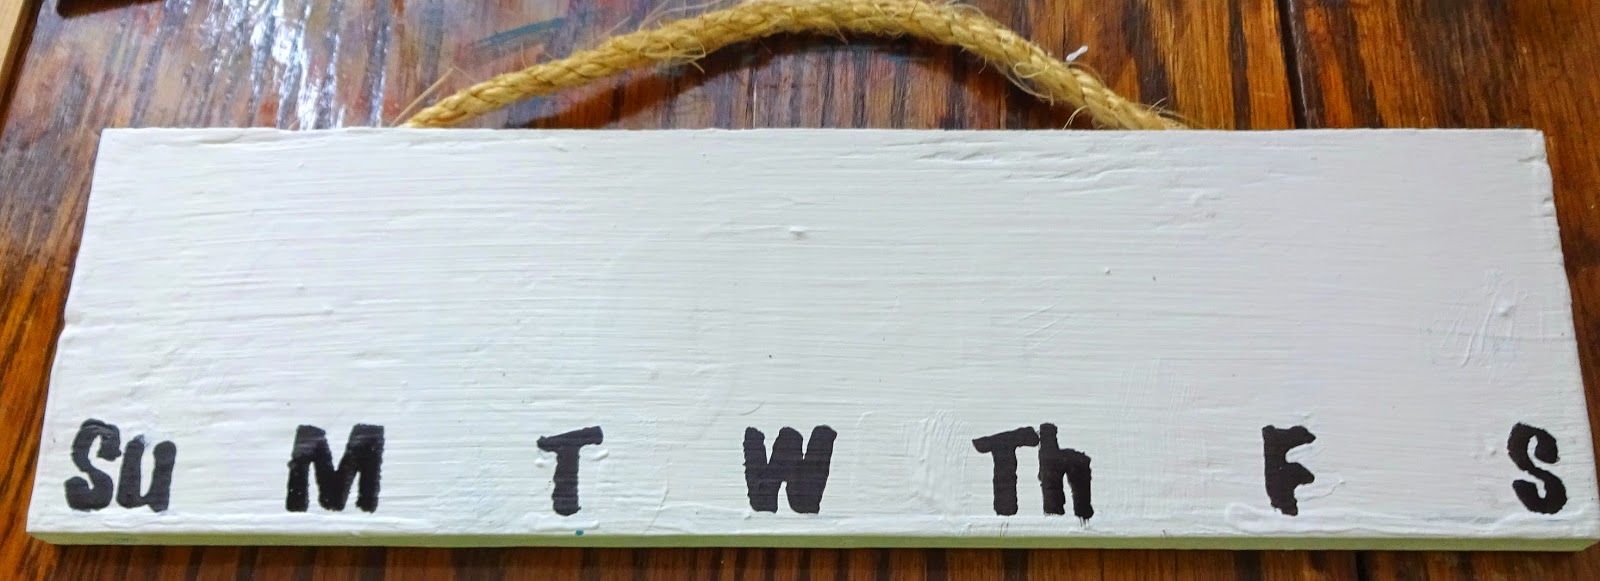
I have been wanting some kind of menu board for awhile. I really love the chalkboard ones but just can't bring myself to buy one. Using things that I already had, I created one. Now this one works for me because I only cook once, maybe twice a week. If I cooked more, I would need a bigger menu board.

I have a bunch of these boards sitting in my closet, I used to use them when we lived in Alabama to put quotes or "Go Noles" on!


 I printed out this guy with my Silhouette:

I decided to stencil the days of the week on the board instead of using my Silhouette.

I wrote them in pencil just in case I made a mistake and it was a good thing I did because, of course, I needed to move some around.

It was easy enough to just paint over the erased pencil marks with white paint. And then I just painted the letters black.


And added what I had printed out with my Silhouette at the top:

Then my loving hubby helped me screw in these hooks underneath each day of the week. We tried just screwing them in but ended up having to drill starter holes in order to screw them in.

Then I found these adorable metallic binder clips that I hung on each hook

The plan is to clip a recipe onto whatever day I'm going to cook that recipe. So far it's worked well. I planned to cook Pork Chop Casserole on Tuesday and did. Then I ate leftovers for a week. I need to find more recipes for one, since my hubby doesn't eat what I eat. I get tired of eating leftovers after a couple days. Any suggestions?

til next time,
nik


Sunday, October 26, 2014

A Tale of Failure

I like to try new things. I see something and think "I could make that" and probably 6 times out of 10, I can figure it out. But sometimes I don't. And today I'm going to share something that I just COULD NOT figure out.

Enter Rocking Chair:


Picked up at a thrift store by my Grandma and then given to me. The seat cushions were the same ugly fabric as the ottoman, they were just being washed when this picture was taken. They didn't wash well so enter the idea of new cushions!! I mean, come on how hard could it be to recover new cushions? It's just measuring, cutting, and sewing. (Ha, if only I had any clue.)

I first tried to measure the chair and then cut out cushion stencils on cardboard. That DID NOT work. Then I had a genius idea, why not take the old cushions and trace them? Hello! Totally worked!!


I cut those out with scissors (which by the way took FOREVER). Then came the fun part, buying foam and FABRIC! (I love fabric, I pretty much hoard it). My hubby and I decided on 2 inch thick foam because it would be more comfortable.

The green fabric was going to be the ottoman, the other fabric the chair.

Next problem, how do you cut 2inch thick foam?? Answer: With a knife and a lot of time.

After cutting out the bottom cushion, I thought I would cover it and then cut out the top cushion. (Reason being I was tired of cutting through foam, plus I thought this would be the easy part).

Now everyone says "measure twice, cut once." I decided to trace my cushion 2 inches bigger all the way around then it actually was. I sewed it up and....it was too big and too small. How can it be both?? Trust me, it can. It was too big wide and too small length. So I took it in on the sides and added 2 inches of fabric.

Is this real life? It was now too small. So I decided to start on the back cushion. I figured I would learn from my mistakes. Ha.
Cutting it out from the foam wasn't so bad. I pretty much have the hang of cutting foam now. Now, when I traced my fabric, I cut just about an inch bigger than I needed.
The frickin' thing didn't fit. This is after I had already doctored it. The first time it ended up being 2 inches too small!! So I added 6 inches, 2 for each side and 2 for the width. Still too frickin' small!! How is that even possible?!?!

It was at this point that I quit. Sometimes you just gotta admit when something has the better of you. I had already put in too much time and effort that it wasn't even worth it to me anymore. I'd love to admit that every time I try something it works, but that's not real life. Sometimes I try things and they don't turn out at all. And that is okay.

So off to Target I went to see if there was such a thing as a "rocking chair slipcover". Guess what? There's not. But after an hour of wondering around (and finding multiple things I did not need but couldn't not buy) I found this:
It says right on the package "fits multiple shapes and sizes". Guess what? It doesn't. The dang thing didn't work, so it will be going back to Target. But while I was wandering around Target, I found this baby ON SALE:
Flannel sheet set for $35! Awesome because we needed new sheets!

So can you guess what the rocking chair is wearing?

Yep, old sheets. And guess what? I love it! And guess what else? It's staying like that for awhile.

Any tips or tricks on recovering cushions is appreciated. One day I may get tired of the sheet and decide to try again.

So not every craft I do is perfect or even gets finished. But just because I failed doesn't mean I won't craft again or even try my hand at this again.

Oh, also, I'm trying to get better at blogging again. We'll see how this goes.

til next time (hopefully that's soon),

nik


Wednesday, March 12, 2014

The Tale of How I Turned One TShirt Into Two Headbands in One Afternoon

I don't have a lot of time for crafting anymore (and blogging is wayyyyyy down on my list). To find out more about why I don't have a lot of time to craft anymore, click here.

Yes, that's right. I am now the proud owner of my (well my husband and mine) very own party store!! And I love it but unfortunately running your own business doesn't leave a whole lotta extra time for anything else. And so my craft room sits mostly unused. But sometimes, when you have a passion for something, you have to MAKE time for it. And so here is the tale of how I took one tshirt and made it into two headbands all in a VERY short amount of time, probably about 30 minutes or less.

I LOVE headbands. I'm lazy. I don't want to give up my sleep time to do my hair in the morning. This means that I have to have a headband collection. And I love to crochet them, most of the time. But THEN, then, I saw a tutorial about making a headband out of a TSHIRT! A comfy, stretchy, cute headband? How could I pass that up?

And I just happened to have a hot pink tshirt that I never got around to wearing. 


The tutorial told me to cut a strip 1.5 inches wide and 2 inches shorter than the circumference of my head.

But like I said before, I'm lazy, and from seam to seam the shirt was about 4 inches shorter than my head. So I just cut there. And then you just sew the ends together. In my book, crafting literally does not get any easier than this. Now you have a headband.


The only problem I had was that it was not wide enough. I like wide headbands and this one was teeny. Not that I won't use it but since it only took me about 15 minutes to make, I didn't mind making one that was wider. This time I cut it 5 inches wide. And cut at the seams again to make two strips.

It looked like this:

This will make 2 headbands!


 Fold it in half, sew and BAM! DONE!


This one is MUCH wider and more my style! Now I only have to decide if it's going to get a flower or some kind of embellishment. My FAVORITE part of this headband is that there is NO hemming. The tshirt naturally rolls under, so it basically hems itself for you!!


So even if you have just started your own business, this is a craft you can knock out in less than 30 minutes!

til next time (and that might be a while),

nik


Thursday, November 14, 2013

Stockings!

The other day at the store my husband saw a 49ers stocking and he was going to BUY it! I was appalled because the stockings in my family were always homemade by my mom. She made them when we were babies and they were always our stockings. I couldn't let my husband BUY one! So to get him not to buy that one, I had to promise I would make him a 49ers stocking.

So I bought this fabric and then I was in a pickle. How do you make this fabric Christmas-y?

The answer to that question is to spend hours at Joann's scouring their fabric until you find the right one, a task I did not mind at all ;)


And I also found the perfect, adorable fabric to make my own stocking with too. I bought 1/2 a yard of each fabric, just in case I messed up.

Many, many moons ago (3 years to be exact because the Christmas after I got married I wanted to make stockings... I'm a bit of a procrastinator) my mother gave me her stocking pattern. I believe she made this pattern herself:


I did not use the heel or toe cuts. She makes these stockings out of felt and I was using fabric and doing the heel and toe felt like too much work.

I folded my fabric in half, wrong side up, so that when I cut out the pattern I could simply pin and sew. I laid the pattern out on my fabric and traced it in black colored pencil:


I forgot to take pictures of the next step but it is super simple. Cut out the stocking, sew the wrong sides together, leaving the top open, and then flip the stocking inside out.

Then for the top seam I simply folded the top over about 1/2 an inch and sewed along the edge:

For the top of the stocking, I used the Christmas-y fabric and cut this out: (again I folded the fabric in half, wrong side up)
Again, I forgot pictures but sew the wrong sides together and flip inside out again.

Then sew that to the top and side of the stocking: 
For the loop, I used the cut from the pattern but you can simply cut out a straight piece of fabric:

Then fold it over and sew it to the inside of the stocking:

(For some reason I am absurdly proud of this picture and how the background is blurry and I have no idea how I did it)

And TA-DA!

 
 A stocking that a 49er fan is very happy with!

And a stocking that a seamstress is super proud of!

I can't wait to hang them up!!

til next time,
nik

Monday, November 4, 2013

A (very) easy and (very) cheap dog bed!

Did you know that dog beds range from $40 up to like $100!?!?!? I was shocked! I knew there had to be an easy and much, much cheaper way to make a dog bed. So I headed on over to the thrift store. After playing around with a couple ideas, we decided a comforter inside a fleece blanket would be soft, warm, and easy to clean (in case of accidents).

The comforter cost me $5 and the fleece was $3 (thank goodnesss for 50% off days!!)


I sewed the fleece blanket in half. I just followed along the seam that was already there so no pinning! (Score! I hate pinning!)
I sewed two sides and left the third open so I could stuff the blanket inside. When I got to the corner I just followed the seam right around.

Then I flipped the blanket inside out so my seam was on the inside.

And I stuffed that comforter inside!
 
And actually I had to steal some old shirts of my husbands to stuff inside because the comforter was a little bit shorter than the fleece. When we were at the store we were debating about getting a sheet to stuff inside but I thought that would be too much. When I got to this point I was really wishing I had gotten that sheet!

Then I laid the whole bed on my sewing table. That made it easier to sew the last side shut.
Because this was for my dogs, I wasn't big on sewing the whole side by hand so that the seam wouldn't show. I just sewed it shut.
The whole project probably took me twenty minutes and that was with taking pictures and going to find old shirts. It cost me less than $10, all I had to buy was the comforter and blanket, I already had thread and everything else.

Oh, and the dogs love it.
I told them to sit on their beds and act happy, so they did! I even made another bed for them so they wouldn't have to share and that one cost less than $10 too!

til next time,
nik

Thursday, October 17, 2013

A Place to Hang Our Keys

My husband and I are notorious for misplacing our keys. Whenever we get ready to go somewhere, one of us is always saying "have you seen my keys?" or "I can't find my keys". I decided it was finally time to solve that problem. My husband had started hanging his keys on a nail by the door and I decided we needed something much prettier than that to hang our keys on.

I originally wanted something that would hold the mail as well but I could not find anything suitable. So I decided I'd just make something to hold our keys and the mail would go in another spot.

I went to Hobby Lobby and found the PERFECT thing. (By the way, if you don't have Hobby Lobby's app on your phone, GO DOWNLOAD IT NOW! They ALWAYS have a 40% coupon available)

I love how this plaque looks and I got the little screw-hangy-things (I'm pretty sure that's the real name) to screw into the bottom for hanging keys.

When I purchased this, my husband asked me if I was going to stencil my quote onto it. I looked at him and said "nope that's why I purchased my Silhouette so I never have to stencil again!" I know I've said this before but I really, really, really love my Silhouette. I have never regretted the money I spent on it.

I already had ideas flying through my brain about what I was going to do and when I got home, I picked out a matching vinyl and paint color. (I purchased 27 (I think) 6x12 vinyl sheets off of Amazon for about $10, even though the sheets are not big, I got a lot of colors for a little price)

Then I painted the middle of the plaque white because that's where I was going to put my quote:

And I painted the outer edges yellow:


I came up with my quote when we were leaving Hobby Lobby. I was going to do "Home Sweet Home" but that is just so cliche and I like to be original!


Love the quote!! Unfortunately when I hung it on the wall, my matchy-matchy scheme didn't work out so well. You couldn't read what it said from across the room. So...I peeled off all the vinyl and picked a different color. 


Much better!! (Plus it's Oregon Duck colors so it really worked out for the best!) The matchy-matchy was cute but this was easier to read and it's cute too!

Hanging on the wall after I got my handy husband to screw in those screw-hangy-things:


I just notice the picture is crooked but be assured that it does hang straight in real life!

Since hanging this up, I have noticed that we have both been better about hanging our keys here!

I'm going to try (fingers crossed) to blog more often. I just realized I haven't blogged about doing anything crafty since May! I just bought my first sewing machine and made curtains so hopefully I will have some time soon to blog about that fun process!

til next time,
nik